Call it pig-headed, being stubborn, or just plain lucky—whatever
it was, it helped deliver me to the finish line of the 2014 Arrowhead 135
Ultramarathon. But fortune favors the prepared, and well-prepared I was. With
nearly 30 years of endurance sports participation under my belt, many of those
spent in the subset of ultramarathon foot racing, I had some experience to
bring to the table.
Although a youth spent in the suburbs of Chicago gave me
some background in cold-weather environs, I had never as an adult participated
in a long-distance race in the extreme cold, especially with temperatures as we
had this year—dipping to -25F for most of the first day of the race. Leading up
to the event, I poured over online accounts of training and equipment advice,
and wish to thank everyone who took the time to post an instructional video or
written tutorial on various topics. I experimented with equipment choices of my
own during training sessions in Oregon. I weighed items on a gram scale to
ensure I was shaving weight wherever possible.
These notes are the product of that testing and of course,
my experience at the race itself. It’s a long list, but since I’ve yet to see a
summary like this posted anywhere (at least for athletes in the foot
division—some veteran cyclist of the race might have his/her own list), I
thought I’d make a run at it (pun intended). Without further ado, the
categories:
--Travel/logistics
--Clothing
--Sled & its contents
--Checkpoint strategy
--Course notes
--Clothing
--Sled & its contents
--Checkpoint strategy
--Course notes
TRAVEL/LOGISTICS
I weighed the cost/benefits of flying from Oregon to
Minneapolis and renting a car, then driving to International Falls, MN (a
5-hour drive, minimum) versus connecting in Minneapolis and flying directly to
I-Falls. The latter won. Note that the evening flight departs MSP around 8pm,
so plan connections accordingly. It’s one of the two flights daily that go to
I-Falls.
I knew I’d have three options to get to my hotel (1.5 miles
from the airport) upon arrival: Taxi, beg a ride from a local, or walk. With
the temperatures, my bags, and the darkness, walking didn’t sound like much
fun. Turns out, a woman on the flight spotted the massive expedition-quality
mittens I was wearing and asked if I was a racer. 15 minutes later, she had
graciously offered a ride from the airport to my hotel!
I-Falls airport is small, but they’re used to landing planes
in weather that might cancel arrivals in much of the rest of the world.
Cancellations only happen (according to an airport official) once or twice a
year, and even then they need driving, freezing rain to do so. So the chances
of your flight being cancelled from MSP is pretty small.
HOTEL: I chose the
Voyageur Motel, run by Gerald and Sandy Netland, and I’m really glad I did, if
only for the proximity to the starting line (less than a 5 minute walk!). It’s
a bit longer of a walk from the motel to the check-in/pre-race meeting, but
offers a good way to work off a bit of nervous energy without stressing your
body too much. Lots of athletes stay here, so book early. Rooms are basic, but
more than adequate, very clean, and comfortable. Doors lead outside directly
from each room for further convenience. The hosts were amazing: I had shipped a
sled to the hotel (more on this later) which they stored for a week before my
arrival. Gerald gave me a ride to the airport the morning I departed at an
ungodly early hour, and also loaned me a screwdriver when I needed to adjust
some equipment. Sandy shipped my mittens and a water bottle to my home after
the race when I had forgotten them in my room. Rates are extremely affordable.
DINING: I guess
I’m spoiled by big city dining choices…I-Falls has considerably fewer dining
options. A good bet for lunch: The Chocolate Moose has a varied menu, with the
obligatory walleye sandwich for some local flavor. Pizza at the Border Bar is
excellent; my pizza came with an interesting altercation between two locals (“You
wanna take this outside?!? Let’s go!!”) which escalated into a full-blown
bare-knuckle scrap outside in the snow. Quite entertaining! Coffee &
espresso is best procured at what I believe is the town’s ONLY proper coffee
bar, the Coffee Landing Café, which was loaded with athletes the day before the
race. The Sunday morning breakfast at the VFW, just south of the Voyageur
Motel, was mildly entertaining and super friendly, but I think you could do
better if you wanted a more substantial plate of food.
PRE-RACE CHECK IN:
Especially if you’re a race rookie, expect to be a bit overwhelmed by the check
in process. After giving your name, number, etc., you’re directed to the far
end of a room where you’ll need to produce your required gear. They WILL
question you if they think your gear is not up to snuff. Once satisfied, a photo
is snapped with you looking nervous and holding your bib number. You’re done!
But be sure to stick around for a while and take the opportunity to meet and
speak with the incredible individuals with whom you’ll be sharing the course.
PRE-RACE DINNER/SAFETY
MEETING: Held in the same building as the check in, the dinner is the
typical pasta fare found at pre-race dinners, served by a very friendly staff.
I was a bit taken aback by the sheer number of those in the room, which seemed
much larger than I had expected. The race director’s slideshow is very
informative and I’m glad I was paying attention, if only to see a photo of the
course directional markings.
FINISH: After
crossing the finish line, I was led through the basement of the casino where I
could dump my sled in a secure area. The race organizers reserve a small
conference room at the casino where racers can find a chair or some floor space
to grab a snack & a drink, kibitz with other athletes, unwind, rest, and
organize gear after the race. Showers are available in the pool locker room,
but you’ll need your own towel…not much fun to think about lugging a big beach
towel over 135 miles of snow! Small Packtowl or use a clean tshirt?
The casino dining room had limited vegetarian choices but
plenty of options otherwise, and food was cheap. I never saw the casino floor
itself, as I had to get on the van that was heading back to I-Falls, a
convenient offering ($20) by race organizers.
The morning flight out of I-Falls, as of this writing, is at
O-dark-thirty, so be prepared for an early wakeup. Better yet, spend an extra
day in I-Falls with other racers and rehash the glory of your finish!
CLOTHING
The biggest variable in the clothing equation as a foot
participant is most definitely the ambient air temperature you expect during
the race. In 2014, the temps were forecasted to be brutally cold, so the
formula for me was pretty simple. Additionally, no snow was expected to fall,
so keeping environmental moisture at bay wouldn’t be difficult. In essence, it
would prove to be dry and very, very cold. Temps throughout the first 24 hours
didn’t vary much from the -25F at the starting line, and wind chill as I neared
MelGeorges (checkpoint #2) probably got down to near -50F as the wind whipped
me into a froth of misery.
During race prep, I developed what I termed the “Triangle of
Concern,” which includes the three body areas I was most worried about: Feet, face, and hands.
For my feet, experience told me to keep things simple, but
to be prepared for disaster. I carried a full foot care packet that would
enable me to deal with blisters & hot spots, but I’m happy to say my feet
were 100% perfect during the race. Matter of fact, even at rest stops, I didn’t
even untie my shoes once between the start and finish line. I didn’t want to
mess with what was working really well. On my bare feet, I wore a pair of
Injinji toe socks, over which I wore a pair of Drymax cold-weather running
socks. For shoes, I found great success with Montrail’s Badrock, which have a
very aggressive outsole pattern for traction on snow, and are also treated with
the “Outdry” technology (similar, I believe, to GoreTex). Although I’m not sure
they were critical, I wore a pair of OR Wrapid gaiters around my ankles. My
feet, toes, and ankles never got cold or even uncomfortable at any time. Tired?
Sure. But not cold!
My hands were covered with Mountain Hardware’s Butter liner
gloves and Nilas down mittens. These mittens were incredible, and kept my hands
warm most of the time. I say “most,” because there were times when fingertips
started to get cold, especially after a pee break or other times when I needed
to remove the mittens. And very late in the race, when I was at a low, low,
low, low point physically and mentally, I noticed during one short break that
my hands were wet! I’m not sure if it was sweat, or that I spilled water on
them, or if it was a hallucination (possible!), but it was weird. I had no
“major” frostbite during the race, but two or three fingertips did turn numb
temporarily after the finish, with full sensation returning in about three
weeks. In summary, the liner glove/mitten combo was very good. I saw other
folks using more old-school Inuit-esque woolen mitten contraptions; I chose to
go with technology in this regard, knowing that any failure could have been
very bad. YMMV…either way can be extremely effective.
I didn’t have a solid strategy to protect my face…I had
planned to go by “feel” as the race progressed. I had in my arsenal: A
balaclava (the CTR Chinuk Multi-Tasker Pro), a pair of ski goggles, a pair of
sunglasses, and some heavy-duty skin cream called “Warm Skin.” The cream was a
good idea, as it offered the first level of protection. I found within an hour
of the start that my goggles would fail completely. The extreme cold and lack
of good venting, along with some worn out foam padding, led the goggles to be
no better than a weight penalty on my sled. So, I went without, leaving my eyes
and cheekbones exposed in the thin slit of the balaclava, which in turn iced
over solidly and became a challenge to manage. At times, the balaclava would
impede my mouth or eyes and I had to adjust it on the fly. My eyelashes
suffered from major frosting, and I had to thaw out the ice chunks from time to
time so I could see. I should mention that I wear (daily wear, soft) contact
lenses, and I kept these in my eyes from start to finish.
Chemical heat packs (the small kind you might have used on the ski slopes) were WORTHLESS in the bitter cold...they just wouldn't activate, and were another costly weight anchor in my sled.
Chemical heat packs (the small kind you might have used on the ski slopes) were WORTHLESS in the bitter cold...they just wouldn't activate, and were another costly weight anchor in my sled.
Other clothing used:
Hat: Mountain Hardwear (similar to the current “Dome
Perignon” but actually an older model)
Backup hat: Mountain Hardwear Zerna Beanie
Neck gaiter: Buff
Baselayers: Columbia Sportswear Omni-Heat
Midlayer: Icebreaker, w/ Smartwool backup
Down jacket: Golite Wenatchee
Outer jacket: Clymb Hudson
Pants: Salomon XA WS Softshell
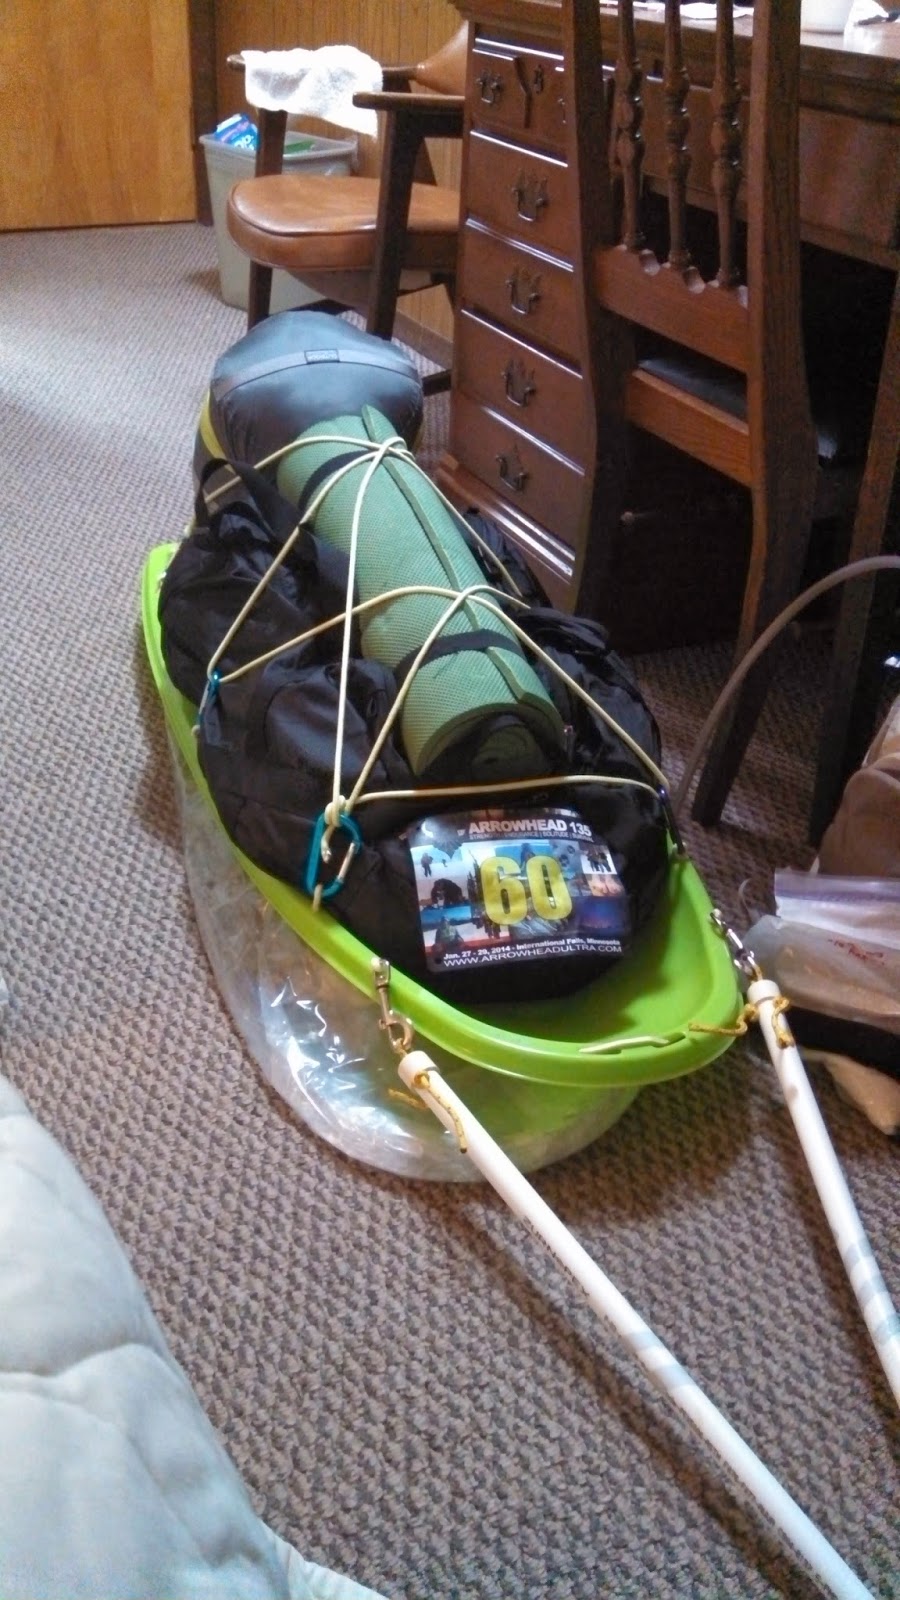
SLED & ITS
CONTENTS
Much of my pre-race equipment planning went into the design
of my sled, or rather, the harness/pulling system I would employ to drag the
sled over 135 miles of snow. I really hate leaving major equipment decisions to
chance. I knew I had limited options regarding the sled itself (a basic cheap
plastic sled): Buy or borrow one in International Falls, bring one with me on
the plane, or buy one online and have it drop-shipped to my hotel in advance of
my arrival (my choice). Phone calls to the Kmart and Menards in I-Falls gave me
varying info on sled availability; trusting the airlines with a flimsy plastic
sled just didn’t seem smart. So with my sled waiting safely for me at my hotel,
I had to figure out my ropes/poles/harness system.
I scoured the internet for tips and ideas before settling on
a hybrid system of sorts. I would make a series of holes in the collar/cowling
of the sled, threading a sturdy rope through the holes with exposed loops I
could use to tie down my gear. Through two of the loops I could attach my pole
system, which would in turn be secured to my waist harness. More on the poles
in a moment.
I experimented with no less than four waist harnesses at
home (pulling a truck tire in training through my neighborhood…quite the
sight!) before I chose an old waist belt from a backpack that I bought in a
surplus store for $10. This particular belt was light, comfortable, and had
plenty of loops to attach carabiners and blinking LED lights.
 Now, the poles: I planned to use two long, flexible PVC
poles or similar, each approximately 6 feet long. But how would I do this?
Check them on the plane? No way. Buy them at a hardware store and drill
necessary holes for attachments? With what drill? The answer came to me one day
when I was looking online: I could use PEX tubing and create three sections for
each 6’ pole, with the top and bottom section being of larger diameter than the
middle section. If I recall correctly, with PEX tubing (more flexible than PVC;
good for the extreme cold) with an outer diameter of ½” inch fits neatly inside
that of ¾”. I could have two foot sections (+/-) that I could transport in my
carry-on bag, pre-drilled with holes/pins to keep the whole setup together! I
assembled everything at home and did test runs on Mt. Hood and on the beach of
the Pacific Ocean (in 60F weather!). While the weather wasn’t even close, I
knew the pole setup would work. Each pole crossed in back of me to give me more
control of the sled.
Now, the poles: I planned to use two long, flexible PVC
poles or similar, each approximately 6 feet long. But how would I do this?
Check them on the plane? No way. Buy them at a hardware store and drill
necessary holes for attachments? With what drill? The answer came to me one day
when I was looking online: I could use PEX tubing and create three sections for
each 6’ pole, with the top and bottom section being of larger diameter than the
middle section. If I recall correctly, with PEX tubing (more flexible than PVC;
good for the extreme cold) with an outer diameter of ½” inch fits neatly inside
that of ¾”. I could have two foot sections (+/-) that I could transport in my
carry-on bag, pre-drilled with holes/pins to keep the whole setup together! I
assembled everything at home and did test runs on Mt. Hood and on the beach of
the Pacific Ocean (in 60F weather!). While the weather wasn’t even close, I
knew the pole setup would work. Each pole crossed in back of me to give me more
control of the sled.") While my poles worked REALLY well during the race, in
hindsight, especially after seeing some of the racer’s sled setups, I think I’d
opt for using two ropes instead: Slightly lighter, but infinitely easier to
obtain, modify, transport, etc. But the biggest advantage would be on the numerous
descents of the course: With ropes, gathering the sled and sitting down for a
fun and quick toboggan ride is MUCH easier than it is with semi-rigid poles,
even if the poles do detach quickly from your waist harness.
While my poles worked REALLY well during the race, in
hindsight, especially after seeing some of the racer’s sled setups, I think I’d
opt for using two ropes instead: Slightly lighter, but infinitely easier to
obtain, modify, transport, etc. But the biggest advantage would be on the numerous
descents of the course: With ropes, gathering the sled and sitting down for a
fun and quick toboggan ride is MUCH easier than it is with semi-rigid poles,
even if the poles do detach quickly from your waist harness.
For my gear bag, I used a large, flexible duffle bag with a
zipper that runs its length. Of course, I carried the mandatory equipment,
which I won’t go into too much detail about here. I will note that my cooking
pot of choice is a really nice Snow Peak titanium one I like. My sleeping bag
was Mountain Hardwear’s Lamina -30. I had an alcohol stove and bought Heet in
I-Falls for fuel. White gas stoves generally work a bit better in super cold
temps, alcohol stoves are fine if you warm up the fuel a bit. For emergency
food, I had peanut butter. I was crazy with lights and reflective gear, and my
sled poles were wrapped with reflective tape. If snowmobiles couldn’t see me,
they had to be blind.
I had two major failures during the race relating to
equipment: Water and lights. I thought my three massive Nalgene water bottles
and Camelbak would be adequate water sources, even if one or more vessels had
frozen. Wrong. All were insulated (but obviously not enough), and I carried the
Camelbak inside two massive jackets to get it as close as possible to my body.
The drinking tube was also insulated, and I blew water back into the bladder
after each sip. It wasn’t enough to see that most of my water source was frozen
before reaching each checkpoints. Even adding warm/hot water to the bottles at
the checkpoints wasn’t enough to stave off freezing.
The solution? I saw one racer (Chris Scotch, if I recall
correctly) with what seemed to be a clever setup. In his sled he carried a
small insulated lunch cooler that contained what appeared to be his lunch
thermos-sized bottles. Each bottle in turn was heavily insulated with shiny
metallic-colored insulation, almost like duct insulation you might find in your
home. At Gateway, where I saw him pour out water, he didn’t appear to be having
any troubles. Also, a number of racers had slings worn around their necks
containing their bottles, carried inside their jackets. Bottles could be
swapped in and out when needed. And the same neck-pouch strategy is used by
many athletes for their food pouch as well. For the latter, I just used a big
outer pocket on my jacket.
My lighting failure didn’t crop up until late in the race. I
was with another runner who was wearing a really bright head torch. Since I
didn’t see the need for both of us to light the trail, I made the brilliant
decision to switch mine to the red (map) light function. My head torch didn’t
like this move, and decided to quit on me altogether (it wasn’t battery
failure, either…the torch turned on without hesitation after the race). Once I
was separated from the other racer (a.k.a. she dropped me like a bad habit), I
was without a light, but dreaded stopping in the bitter cold to dig in my sled
bag for my spare. Eventually I did, but it taught me a valuable lesson: Have
critical backup equipment where you can find it QUICKLY, not buried in the bag.
Also, use LITHIUM batteries, not alkaline, which perform better in cold temps.
Race directors require at least one 3 LED in both the front
and back of your sled/person, so be prepared to secure really good lights to
your setup. And be clear on number placement. An odd race rule requires you to
have one bib number on the front of your body (which makes sense) and one on
the FRONT of your sled (which makes no sense at all…back of the sled seems more
intuitive). But rules is rules, and ignorance is no excuse.
I decided against trekking poles, but that was another
mistake of mine. Experienced racers carried them, and for good reason. On the
snow, they really help with your purchase/traction and forward propulsion. I
ended up grabbing two sticks from the forest after the Gateway checkpoint
(nicknamed “Stan” and “Ollie”) on advice from a veteran racer, but if I did the
race again I’d bring or obtain trekking or xc ski poles.
CHECKPOINT STRATEGY
As they say in the old movie, “Badges? We don’t need no
stinking badges!” That’s sort of how I feel about my checkpoint
strategy…sometimes, especially in great races of this sort, I like to wing my
checkpoint and rest strategy. But with so many variables and so much on the line
that would hinge on making good small decisions, I decided to have a race plan
based primarily on the checkpoint data of previous years’ versions of
Arrowhead. I assembled a spreadsheet and looked at the average and median times
spent at each checkpoint by racers who finished within a reasonable range of my
goal finish time. This gave me a rough guideline of what was reasonable for the
time I could allot to each checkpoint.
I knew I’d have to take care of the basics at the
checkpoints: Refueling, hydration, drying out my clothes, and the like.
Everyone is different, with different goals. I saw sleep as a luxury. I didn’t
sleep at Gateway, caught 45 minutes at MelGeorges, and 5 minutes of shut eye at
Ski Pulk, with no trailside bivy. I suffered the consequences (massive
hallucinations brought on by exhaustion), but was prepared to pay the piper
with my pre-race strategy. Your mileage—and strategy—may vary.
COURSE NOTES
I read everything I could get my hands on that pertained to
course description, but didn’t find anything other than general notes (for the
most part). The trail is fairly mundane with regard to “scenery” (trees, trees,
and more trees), but that’s a West Coast mountain guy talkin’. The beauty of
Arrowhead is in the peacefulness and serenity. “Aloneness” doesn’t necessarily
equate to “loneliness,” but one does need to be prepared to be alone on the
trail for many hours at a time. Race veterans had warned me of that, but I
don’t think I could truly appreciate what they meant until I found myself all
alone out there!
The trail itself is flat for most of the first portion
(start to checkpoint #1). Although it winds and bends in this section, it’s
mostly long, flat stretches of trail. It felt like we were very gradually
climbing all the way to Gateway. Some of the trail is exposed to the wind, but
most in the first section is lined with trees for protection.
I left Gateway just as night was falling, so I can’t tell
you much about the section from there until MelGeorges, other than the hills
start, and some of them started to feel pretty steep (but short). The darkness
was penetrating, and the cold really seeped into my bones at this point.
Freezing water bottles with 10 or more miles to go before checkpoint #2 didn’t
help much. The size of the hills increased in direct proportion to my fatigue
and level of cold. Yes, you read that right. By the time I got to the “5 Miles
to MelGeorges Resort” sign, I was cooked (undercooked? Raw?), and those next “5
miles” were in fact the longest 5 miles of my life. Crossing the wide expanse
of exposed lake was seriously unpleasant, as there are no trees to protect you
from any wind. Here’s where the temp and wind chill combine to make things very
challenging. When you get to the end of the trail markings that lead to the
lake shore, keep following the pathway/sidewalk to your right around a curve
(maybe 1/8 mile from the first building you’ll see) to find the actual
checkpoint cabin. Very confusing, so may the force be with you!
After checkpoint #2, some monster hills await. Luckily, you
might be somewhat rested after the checkpoint with a belly full of food. The
biggest hill is a doozy of a climb…almost hand over foot. Then the trail
flattens again for many miles, crosses a road, and enters another mostly flat
section. It starts to roll again and continues rolling past checkpoint #3 (Ski
Pulk, a.k.a. the “Teepee of Despair”). Don’t worry too much about the big hill
after c.p. #3…it’s over before you know it.
The flat sections in the last 20 miles of the race are very
tough on your mind. Wind can be a factor here, too, as I noticed much blowing
snow that made navigation for a tired mind and body really challenging. I only
had a few footprints and one or two bike tracks to follow, so I had to focus.
The winding track at times seems to double back on itself, and if you’re there
in the dark, there won’t be much light to lend any perspective on direction or
distance.
The final few miles seemed to go on forever (duh!). I was
seeing all sorts of visions at this point, but vaguely recall running down a
road, passing some buildings, and then the actual finish banner!
FINAL NOTES
As I noted in my introduction, I was very fortunate to
finish. The conditions, coupled with the distance, make this race extremely
challenging. But it’s doable for those who have a blend of physical and mental
toughness. And I guess luck plays a bit part, too. Good preparation, however,
will take you far, and hopefully reduce the luck you’ll need to find come race
day. Whomever you are and whenever you might read this, I wish you much
success. If you’re contemplating entering this event, it might be good to
remember the slogan of the Arrowhead 135 Ultra: Strength. Endurance. Solitude. Survival…Cowards Won’t Show, and the
Weak Shall Perish.
2 comments:
Thank you for writing this up Greg! It was great to read about such specific details. It was also reassuring to read that you learned some of the same lessons (i.e. how you would do it differently)that I did. Congrats on a very well earned finish! Enjoy that trophy (I really hope to have one of my own "soon"!)
Thanks for sharing this. It is all very good information, there isnt much out there. I just mailed off my rookie entry form yesterday.... gulp. Paul
Post a Comment